
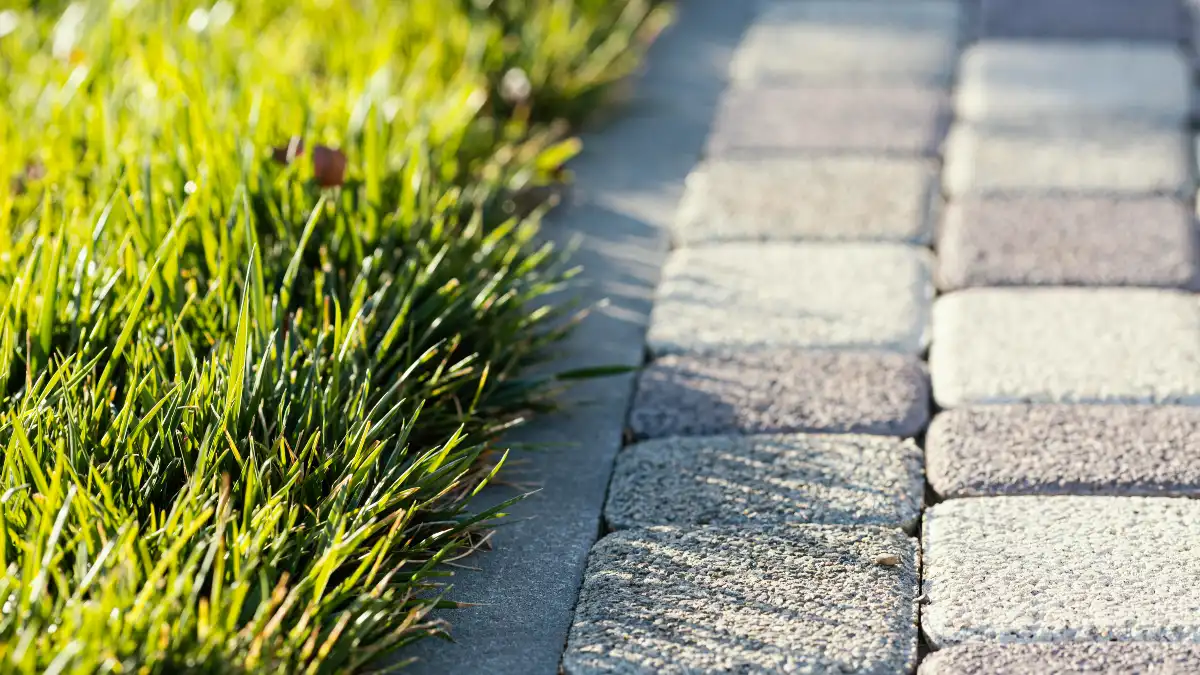
“A neat lawn edge makes a garden look finished—even before the flowers bloom.” A clean, durable border stops grass from invading beds and lets you mow without babying the trimmer. Many homeowners try plastic strips, only to watch them heave, fade, or pop out. Brick garden edging solves those headaches and, when set as a brick mowing strip, it lets your mower ride right over the edge so you trim less and enjoy the yard more (Kansas State University Extension).
In this guide you’ll get the pros and cons, cost per linear foot, the exact tools and base depths that prevent shifting, and a step-by-step on how to install brick edging—both a flush mowing strip and a low raised border—plus how to lock the joints with polymeric sand and keep weeds out long-term. You’ll also see quick brick landscape edging ideas (patterns and curve tips) you can copy today.
2024–2025 quick costs (national benchmarks):
| Item | Typical range (per linear foot) |
|---|---|
| DIY materials (brick only) | $1.50–$5.50 |
| Pro installation (turnkey) | $22–$29 |
Figures above are compiled from HomeGuide (materials) and Homewyse (installed).
Bottom line: a properly built flush brick mowing strip eliminates most trimming and stays put for years—if you compact a real base and finish joints correctly.
Brick Garden Edging: Pros, Cons, and Where It Shines
Which Garden Edge Fits Your Goal?
Use this quick map, specs, and cost checks to decide when brick beats plastic, metal, or concrete—and how to keep it stable for years.
Decision Map
Want less trimming? Choose a flush mowing strip—your mower rides the edge.
Need to hold mulch/gravel? Choose a raised brick border with hidden restraint.
Curvy beds? Brick handles arcs gracefully without kinking.
After a modern, razor line? Consider metal, but expect more cuts on tight curves.
Build Once, Not Twice
- Base matters: 4–6" compacted aggregate; 6–10" in freeze–thaw zones.
- Lock joints: polymeric sand (activated) to resist wash-out & weeds.
- Restrain curves: hidden paver edging on the bed side.
Specs echoed by industry tech (ICPI/Masonry & Hardscapes) and 2024–2025 pro guides.
Material Snapshot (DIY-friendliness vs. Curves & Upkeep)
| Material | Where it shines | Curve friendly | DIY difficulty | Maintenance burden |
|---|---|---|---|---|
| 🧱Brick | Classic look; matches house/patio; great on curves | Moderate (needs base & compaction) | Low if based & jointed well | |
| ♻️Plastic | Lowest cost; easy curves | Easy | Higher (UV/brittleness & lifting over time) | |
| Metal | Razor-straight modern lines | Moderate | Low | |
| ▭Concrete | Durable, tidy, set-and-forget | Higher (forms, finish, cure) | Low |
Plastic’s low price comes with brittleness/lifting risk (noted in retail & contractor guides). Brick only shifts if you skimp on base or joint lock.
Brick Build Specs
- Base: 4–6" compacted aggregate (6–10" in freeze–thaw).
- Bedding: ~1" sand, screeded true.
- Joints: polymeric sand, activated per label.
- Restraint: hidden paver edging, tighter spikes on curves.
Specs aligned with ICPI/Masonry & Hardscapes tech, Sakrete, and 2025 pro install guides.
Use Brick When…
- You want curves without kinks.
- You need a match to house or patio materials.
- You value DIY-friendly repairs and replacements.
Raised vs. Flush
- Flush: mow-over convenience; lowest routine trimming.
- Raised: holds mulch/gravel; more formal look.
Raised often needs a trimmer pass along the lawn edge.
A mowing strip is a flat, hard border laid flush with the lawn so your mower wheel rides on it—meaning less string-trimming and a sharper edge (definition per Pavingexpert). Choose flush when you want low maintenance and an edge you can mow over; choose raised when you need to hold mulch in or visually separate gravel paths from beds.
Versus other materials:
- Plastic: lowest upfront cost and flexible for curves, but tends to look tired and can lift or become brittle under UV and freeze-thaw, leading to more maintenance. Retail guides even pitch aluminum/steel as a small price jump with better longevity (Lowe’s; several trade sources note brittleness over time).
- Metal (aluminum/steel): sleek lines, good durability, excellent for straight runs and modern designs; can look stark in cottage gardens and isn’t as forgiving for tight curves.
- Concrete curbing: durable and tidy but far less DIY-friendly, with higher installed cost and limited texture options.
- Brick: classic look, easy to source, naturally fits curves and corners, and can match house or patio materials. The caveat: bricks can shift if you skimp on the base or joint locking—so build the foundation right. (Cost trackers also flag minor shifting as the main con.)
Specific, practical takeaway: If you want curb appeal plus easier mowing, a flush brick garden edging is the sweet spot: timeless look, adaptable to curves, and maintainable by a homeowner—provided you compact a 4–6″ crushed-stone base and lock joints with polymeric sand. That’s the difference between a weekend project and a redo next spring.
What Brick Type and Materials to Buy (Checklist)

Bricks: Buy clay paver bricks, not house (face) bricks. Pavers are engineered for ground contact and freeze-thaw; for pedestrian applications, industry tech specs list ~2⅜ in. (60 mm) thickness as standard (heavier 80 mm units are for vehicles). ORCO and ICPI tech sheets reflect these norms.
Base + bedding: Plan on 4–6 inches of compacted crushed stone (dense-graded) under edges in moderate climates, topped with ~1 inch of screeded bedding sand. That base depth is echoed across masonry/hardscape association guidance and extension how-tos. In freeze-thaw zones, increase base thickness (details next section).
Jointing sand: Choose polymeric sand. It resists wash-out and inhibits weeds better than plain sand when installed and activated per the label (Sakrete). It’s the simplest long-term maintenance win you can buy.
Edge restraint: Hidden paver edging (PVC or aluminum) with spikes prevents lateral creep—especially on curves or raised courses. This is inexpensive insurance that keeps your lines straight.
Geotextile (when to add): On clay soils or chronically wet subgrades, lay a geotextile over the subgrade before the base. It separates soil from aggregate and improves stability; major paver brands explicitly recommend it on clays and in demanding climates (Belgard).
Shopping list (copy/paste to phone): clay paver bricks; crushed stone base (¾” minus); bedding sand; polymeric sand; edge restraint + spikes; geotextile (if clay/wet); mason’s line; rubber mallet; hand tamper/plate compactor.
Step-by-Step: How to Install a Flush Brick Mowing Strip
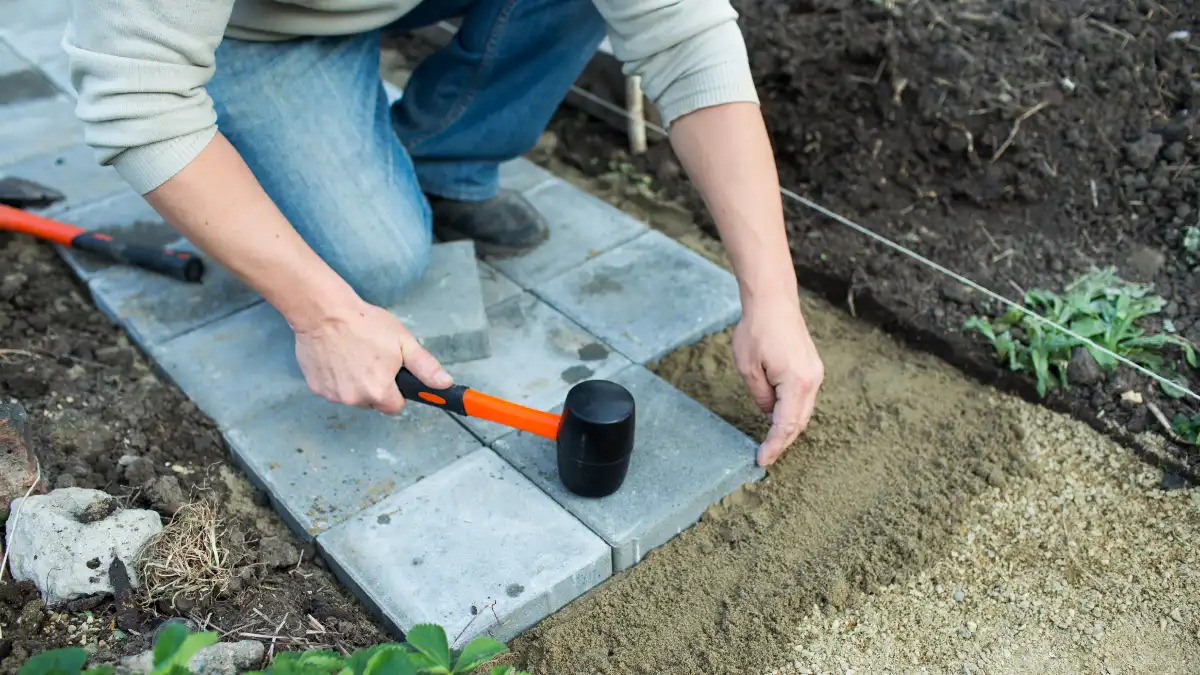
A flush mowing strip is the lowest-maintenance way to edge a lawn. Follow this build order; don’t skip compaction.
1) Layout & excavation
Snap a taut mason’s line (or garden hose for curves) to mark the edge. Excavate a trench wide enough for the bricks plus 4–6″ of base and ~1″ of bedding sand. Your target finished height is flush with the turf, so calculate trench depth as: base + bedding + brick thickness, adjusted to match lawn grade (The Spruce’s mowing-strip method aligns to this calculation approach).
2) Base: build the foundation
Add 4–6″ of crushed stone (dense-graded) in 2″ lifts, compacting each lift with a plate compactor or hand tamper. In climates with hard winters or known frost-heave, deepen the base to 6–10″+—a current 2025 paver guide recommends excavations of 10–12″ to accommodate thicker base in freeze-thaw zones. If your subsoil is clay or stays wet, lay geotextile on the subgrade before the base for separation and stability.
3) Screed bedding sand
Spread ~1″ of bedding sand and screed it flat. Don’t walk on it after screeding. The 1″ rule is consistent across trade and extension instructions.
4) Lay bricks tight and true
Set bricks snug, level, and flush to the lawn side. For straight runs, sight along the string; for curves, dry-fit and keep joints even. Tap bricks down with a rubber mallet to seat them without rocking. Work in small sections so you don’t disturb the screeded sand. (DIY tutorials consistently specify tapping to level and maintain alignment.)
5) Edge restraint (hidden but essential)
Install a paver edge restraint on the bed side (garden bed side) and spike it into the base every 8–12 inches, closer on tight curves. This prevents lateral creep from foot traffic, freeze-thaw, or mower pressure.
6) Compact & joint
Lightly compact the surface to seat the bricks into the bedding sand (use a compactor with a pad or a hand tamper). Sweep polymeric sand into joints, compact again to top off, then carefully mist with water to activate the binders—following the label’s wetting and drying schedule. Proper activation is what makes the joints resist weeds and wash-out (Sakrete).
7) Final checks & clean-up
Ensure the mowing strip is flush with surrounding turf and that the surface sheds water away from structures. Replace any lifted sod neatly against the brick edge.
Climate note: If neighbors complain about winter heave, add base thickness and consider open-graded base mixes designed to manage freeze-thaw water movement more safely; commercial tech notes explain why open-graded bases reduce heave risk.
Time-saving tip: Start with a 10–20 ft pilot strip to dial in trench depth, compaction, and joint finish before edging the whole yard. It’s the fastest way to avoid rework.
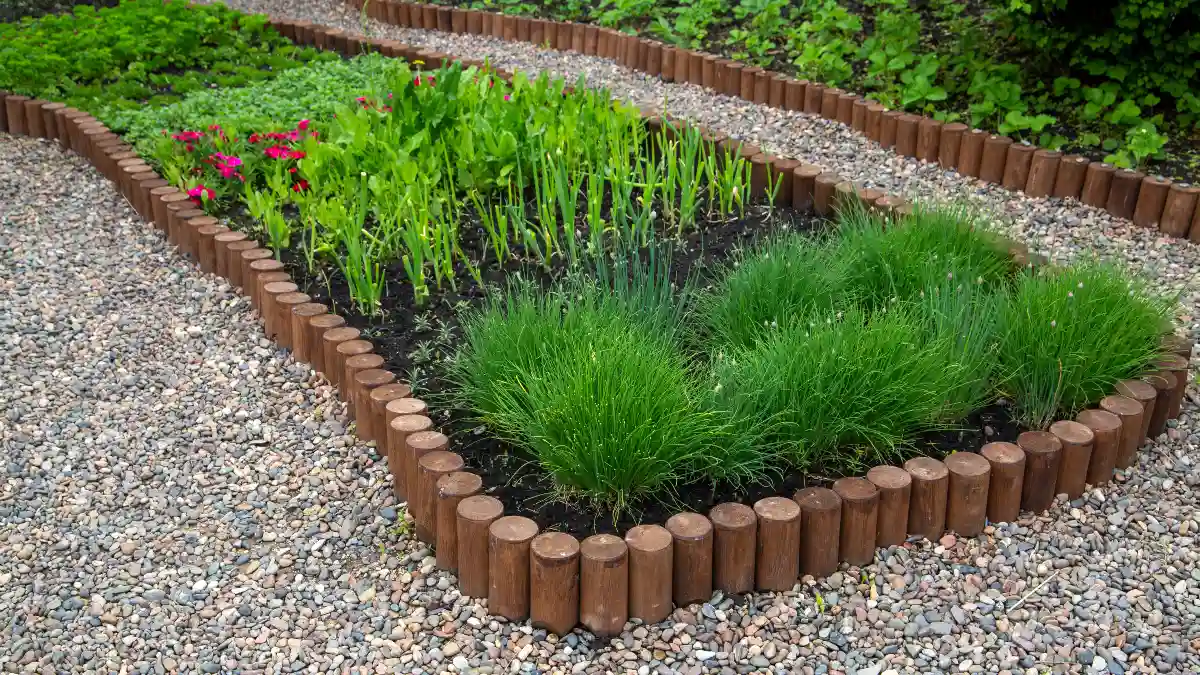
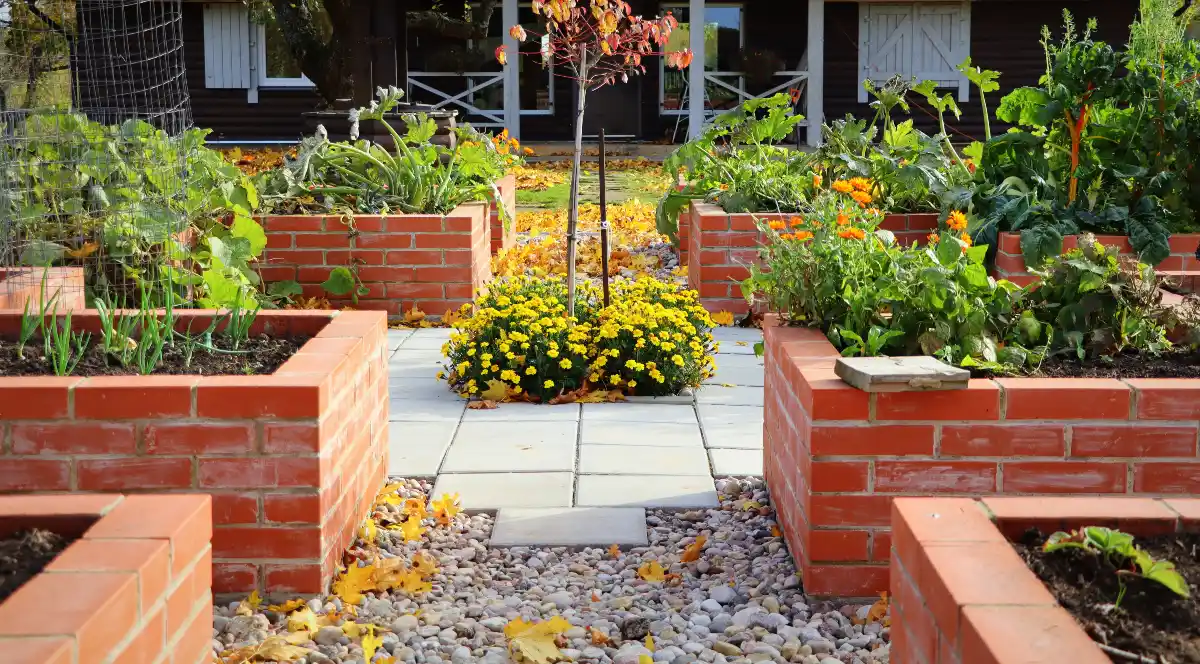
Raised Brick Border: When You Want More Separation
Choose a raised brick border when you need a crisp visual line and extra containment—think deep mulch beds and gravel paths that like to wander. It keeps mulch in, stops gravel splash, and signals a more formal style than a flush strip. The trade-off: it can be a small obstacle for mower wheels, so you’ll likely trim where the lawn meets the vertical face (retail and project guides consistently note the “formal but less mowable” nature of raised borders).
Build rules mirror a mowing strip: compact a real 4–6 in. crushed-stone base (more in freeze-thaw), screed ~1 in. bedding sand, and set bricks level course by course. Add a hidden edge restraint on the bed side to lock the run—especially on curves or where foot traffic pushes laterally; this is standard practice in big-box project guides and pro tutorials. Mortar isn’t required for most garden borders; reserve it for decorative caps or short accent returns where you want a bonded look.
Jointing that lasts: finish with polymeric sand to reduce wash-out and weed seed germination in joints—manufacturers specify that, when activated correctly, polymeric sand helps resist rain washout and reduce weed growth compared with plain sand. If you add a mortared cap, still use polymeric sand in the lower joints to control movement and maintenance.
Best placements: around gravel paths, mulch-heavy shrub borders, or beds along slopes where a low brick lip tames spillover without needing a tall wall.
Design Ideas: Patterns, Curves, and Color Matches
Treat edging like trim work—small choices change the whole look. For patterns, try a soldier course (bricks on end for a clean line), stack bond (simple and modern), or herringbone for heritage charm at corners and entries. Many paver catalogs show these as standard edging looks, and they’re easy to dry-lay before committing.
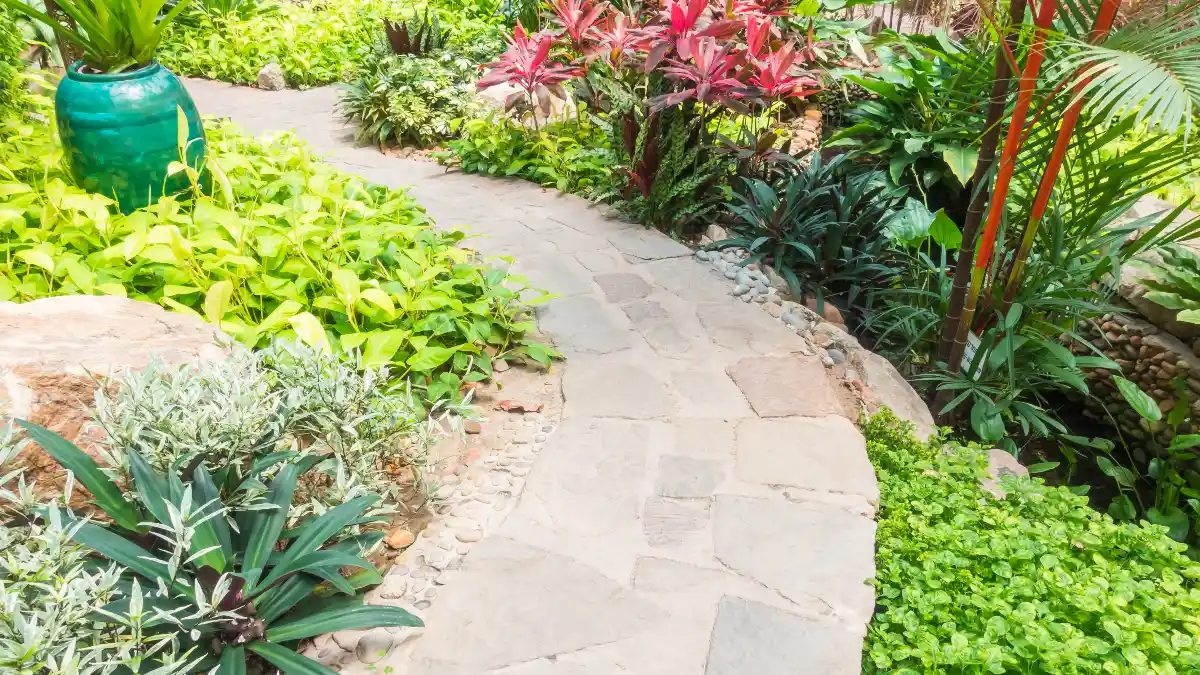
Curves are a brick strength. Bricks articulate gentle arcs better than wood or rigid metal. Extension offices (like Johnson County/K-State) teach using a flexible layout line—a hose or rope—so you can test the curve before digging; pros then dry-fit with consistent ⅛–¼ in. gaps to keep joints even through the arc. This dry-fit pass also flags where you’ll need occasional cuts for tight radii.
Color strategy: Match brick tones to your house brick, patio, or path for continuity, or go high-contrast so the edge reads as an intentional frame. Tie-ins look best when the edge pattern echoes the adjacent hardscape (e.g., running-bond path with a soldier-course edge). Pro installers commonly mock up a 3–4 ft sample of two options and view it from the street before deciding.
Pro layout habit you can steal: Lay a test course on the compacted base before bedding sand, confirm the geometry, then pull it, screed sand, and reset—this keeps the curve you love while preserving a level bedding layer. (Technique mirrored in contractor tutorials.)
Cost: DIY vs. Pro in 2025 (Per Linear Foot)

DIY materials: For plain bricks, expect about $1.50–$5.50 per linear foot (materials only). That aligns with current national cost trackers; bricks themselves typically price in the $0.35–$0.90 each range depending on style and region. Bedding sand, polymeric sand, and base rock are extra.
Pro install benchmarks: Current 2025 estimator data pegs installed brick edging at roughly $22–$29 per linear foot (national baseline, zip-code adjusted). On whole-project averages, edging jobs commonly land in the $630–$1,710 range depending on length and material—figures echoed by multiple 2024–2025 trackers for cross-checking.
Why prices swing:
- Excavation & haul-off (rocky soils, roots).
- Curves vs. straight runs (curves take more cuts and restraint).
- Climate (freeze-thaw calls for deeper base, so more material and labor).
- Access (tight side yards = more hand work).
Reality check by material: Granite or premium stone edging can push $27–$36+/lf installed, while generic “landscape edging” categories (plastic, simple steel) can be far cheaper per foot—but also less durable. Use the brick benchmark above for apples-to-apples.
Maintenance: Keep Edges Neat and Weed-Free
A flush brick mowing strip cuts routine trimming because the mower wheel rides on the brick, not into the bed—extension guidance calls this out as the big timesaver versus a soft edge. Keep your blade sharp and mow with one wheel on the strip for a clean line.
Joint care: If you see gaps, top up polymeric sand and re-activate per the label; manufacturers note that correctly activated joints resist washout and slow weed growth far better than plain sand. Sweep dry, compact lightly, then mist as directed.
Edge touch-ups: Re-cut or shear the grass edge at the start of the growing season and after heavy growth flushes. The RHS recommends using a string line (or hose for curves) and long-handled edging shears for a crisp, vertical edge; quick monthly touch-ups keep it photo-ready.
Skip fabric in planting beds: Multiple extensions advise avoiding landscape fabric for routine beds; it can impede soil life and water/air movement and still collect dust that seeds sprout in. Instead, use coarse organic mulch (chips or straw-like materials) 3–4 inches deep—UF/IFAS notes that larger particles suppress weeds better by blocking light and drying faster after rain.
Conclusion
Built correctly, brick edging gives you a tidy, durable border that upgrades the whole garden. A flush mowing strip is the low-maintenance winner—your mower rides the edge, trimming drops way down, and the line stays sharp. The keys to longevity are simple: compact a real base, keep bedding near 1 inch, and lock joints with polymeric sand.
Measure your beds, estimate base depth from the climate table, and pilot a 10–20 ft run to dial in trench depth and compaction before edging the whole yard. Then keep joints topped and edges touched up each season. If you’ve been on the fence about brick garden edging, this is the weekend to try it—start with a small mowing strip and enjoy the payoff every time you mow.
